
2.1. Methods, Selection, and Repeating Actions
“Computer Science is not programming. Rather, programming is the medium for our art, just as writing is the medium for English and other majors. And, like all writing, it is refined by rewriting. The trick is to do the rewriting in your head before your fingers hit the keys.” – Nick Parlante
In the previous chapter, you learned how to create instances of existing
classes and invoke their methods. In this chapter, you will take the next step
as a software designer: creating your own custom subclasses, defining new
methods to give actors specialized behaviors, using sensor queries to make
decisions with if and if-else statements, and repeating actions using
while loops.
2.1.1. Creating Smarter Jeroos (Subclassing Basics)
2.1.1.1. Creating Subclasses
Let’s consider the Chess example from the previous section. If we wanted to
create a ChessPiece class, it might look like this. For now, let’s not
worry about the attributes or methods, just the class definition.
public class ChessPiece
{

}
Creating the King class would then look like this:
public class King
    extends ChessPiece
{

}
This extends keyword tells java that the King class is a subclass
of ChessPiece.
2.1.1.2. Creating Smarter Jeroos
In addition to creating subclasses of Island to
provide different maps, we can also create our own subclass(es) of
Jeroo. If you create a subclass of Jeroo,
you can add new methods to it so that your personal jeroo understands
a larger vocabulary of actions. You can then use these new methods
to solve problems.
As an example, suppose we wanted our jeroo to know how to hop
and plant flowers at the same time–that is, each time it takes a
hop forward, it also plants a flower (if it has one). We can do
this by adding a hopAndPlant() method of our own. But
to add a method, we need to a class of our own to write it in.
Try It Yourself
Create a Jeroo subclass with the name of your
choice (remember to capitalize the first letter of the name).
Write a method called hopAndPlant() that hops one
square and then plants a flower.
2.1.2. Summarizing: What is Inheritance?
2.1.3. Creating and Using Jeroo Methods
For some problems, it would be convenient if we could extend the basic behaviors of Jeroos (or other objects). Java allows us to write programmer-defined methods that extend the behavior of every object created from a given class.
2.1.3.1. Creating and Using a Jeroo Method
The concepts of behavior and method were defined earlier and are repeated here. A behavior is an action that an object can take or a task that it can perform in response to a request from an external source. A method is a collection of statements that are written in some programming language to describe a specific behavior.
These definitions imply that the creation of a method is a two-part process. First, we need to define and name the new behavior. Second, we need to write the source code for the method.
2.1.3.1.1. Defining a Behavior
The first question we must ask is “How do I decide on a good behavior?” There is no fixed answer to this question, but there are some guidelines to follow.
Examine the high-level algorithm. Any complex, but well-defined, step is a candidate for a new behavior, especially if two or more Jeroos need to perform that step.
Examine the detailed-algorithm. Any sequence of steps that occur several times is a candidate for a new behavior.
These guidelines serve as a starting point, but experience is a good teacher. Examine your own programs and those of others. A good behavior has a very clear definition and is used more than once in the program.
2.1.3.1.2. Writing a Jeroo Method
A Jeroo method contains the source code that describes what an arbitrary Jeroo needs to do to carry out the corresponding behavior. The form of a Jeroo method is:
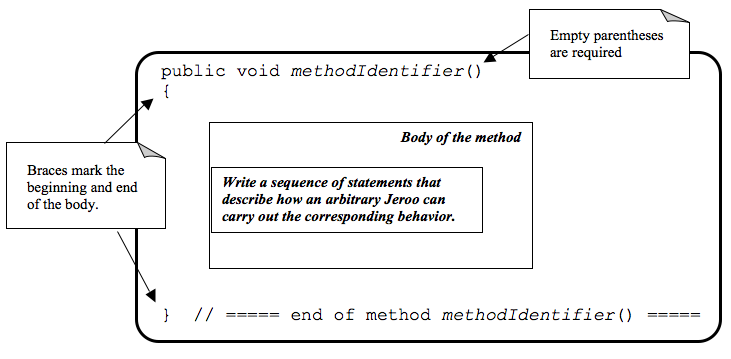
The methodIdentifier on the first line (the header line) is a name that the programmer chooses for the method. The name should indicate the corresponding behavior. The rules for creating an identifier for a method are the same as those given in Module 1–but remember that we always start method names with a lowercase letter. In every method, we should indent every line between the opening and closing braces.
Note
The name of a method should be a verb or a short verb phrase that describes what the method does.
Since a Jeroo method defines a behavior that applies to every Jeroo, we cannot send a message to a specific Jeroo. Instead, we use the special Java name this, which is like a pronoun that refers to the Jeroo that is performing the entire method.
2.1.3.1.3. Example: Turn Around
If we wanted to add a method to cause a Jeroo to turn around, we
need a class to place it in. We have to create our own subclass of
Jeroo to hold our code. In BlueJ, you can use the “New Class…”
button to create a new subclass of Jeroo
with a name of your own choosing. In that new subclass, you could add
a method to turn the jeroo around:
// ----------------------------------------------------------
/**
 * Turn the jeroo around 180 degrees so it faces the opposite
 * direction.
 */
public void turnAround()
{
    this.turn(LEFT);
    this.turn(LEFT);
}
2.1.3.1.4. Example: One Method Can Use Another, or Even Itself
This example introduces two new behaviors: planting four flowers in a row, and planting two adjacent rows with four flowers per row.
// ----------------------------------------------------------
/**
 * Plant four flowers in a row, starting at the current location.
 */
public void plantFour()
{
    this.plant();   // -- one ---

    this.hop();
    this.plant();   // -- two ---

    this.hop();
    this.plant();   // -- three ---

    this.hop();
    this.plant();   // -- four ---
}


// ----------------------------------------------------------
/**
 * Plant two adjacent rows of flowers.
 */
public void plantRowsOfFour()
{
    // --- Plant first row ---
    this.plantFour();

    // --- Move into position for next row ---
    this.turn(RIGHT);
    this.hop();
    this.turn(RIGHT);

    // --- Plant second row (in opposite direction) ---
    this.plantFour();
}
2.1.3.1.5. Using a Jeroo Method
A Jeroo method is used just like any other method. In our island’s
myProgram() method, we just have to be sure to create
a jeroo from our special subclass that contains the new methods we
want to use. Then we send a message to a specific Jeroo object,
requesting that Jeroo to perform the task associated with the method.
As an example, suppose we had created our own Jeroo
subclass called PlantingJeroo, and added the
plantFour() and plantRowsOfFour() methods
to it. Then in our island subclass, we could have a new Jeroo named
Ali plant two rows of flowers, south and east of (5, 5):
public void myProgram()
{
    PlantingJeroo ali = new PlantingJeroo(8);
    this.addObject(ali, 5, 5);

    ali.plantRowsOfFour();
}
2.1.3.2. Preconditions and Postconditions
We should always define a behavior carefully before we write the code for the corresponding method. A complete definition for a behavior must include a statement of the preconditions and the postconditions. A precondition for a method is something that is assumed to be true before the method is invoked. The portion of the code that invokes the method is responsible for ensuring that all preconditions are satisfied before the method is invoked. A postcondition for a method is something that is true after the method has been executed. The code within the method is responsible for ensuring that all postconditions are met. The process of determining good preconditions and postconditions can be difficult, but it is easier if we remember a few characteristics of objects and methods.
All work is done by sending messages to objects.
Exactly one object executes a method in response to a message.
A method can modify the attributes of the object that executes the method, but cannot directly modify the attributes of any other object.
One method can send messages to several different objects, and those messages can lead to modifications in their receivers.
Using the previous list of characteristics as a guide, we can use
the following questions as a basis for writing preconditions and
postconditions. When we are working with Jeroos, we need to consider
how a method can change the attributes of the Jeroo object that executes
the method. In some cases, Jeroo actions like pick(),
plant(), and toss() can change the attributes
of the world by adding or removing objects, although we normally don’t
send messages to these other objects directly. Behind the scenes,
the pick(), plant(), and
toss() methods send appropriate messages to the island in
order to add or remove objects corresponding to the desired behavior.
| Precondition Questions | Postcondition Questions |
|---|---|
Do any of the attributes of the receiving object need
to have special values?
Location |
How does this method affect the attributes of the receiving
object?
Location |
| Are the contents of certain island cells important? | Have the contents of any island cells changed? |
The preconditions and postconditions can be created rather informally, but the final versions should be stated in a comment block at the beginning of the source code for the method. As an example, consider the method from the previous section to plant four flowers in a row:
// ----------------------------------------------------------
/**
 * Plant four flowers in a row, starting at the current location.
 *
 * @precondition The three spaces directly ahead of the Jeroo are clear.
 * @precondition The Jeroo has at least four flowers.
 * @postcondition The Jeroo has planted four flowers, starting at its
 *     current location and proceeding straight ahead.
 * @postcondition The Jeroo is standing on the last flower, and facing in
 *     its original direction.
 */
public void plantFour()
{
   this.plant();   // -- one ---

   this.hop();
   this.plant();   // -- two ---

   this.hop();
   this.plant();   // -- three ---


   this.hop();
   this.plant();   // -- four ---
}
2.1.3.3. Example: Clear Nets and Pick
The section contains an extended example that demonstrates the algorithm development process, and shows a recommended process for developing source code that contains Jeroo methods.
2.1.3.3.1. Problem Statement (Step 1)
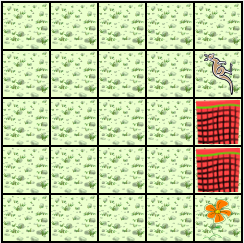
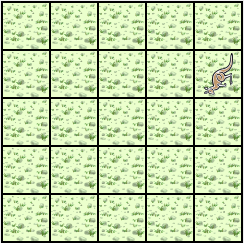
A Jeroo starts at (4, 1) facing North with 5 flowers in its pouch. There are two nets immediately South of the Jeroo at locations (4, 2) and (4, 3). There is a flower directly South of the second net. Write a program that directs the Jeroo to disable the nets and pick the flower. After picking the flower, the Jeroo should return to its starting location and face South.
Start
Finish
2.1.3.3.2. Analysis of the Problem (Step 2)
The Jeroo must turn around to locate the first net
Each net is directly South of the previous one
The first net is directly South of the Jeroo
The flower is at location (4, 4)
The Jeroo must finish facing South at location (4, 1)
The Jeroo should finish with 5 - 2 + 1 = 4 flowers
2.1.3.3.3. Detailed Algorithm (Steps 3 and 4)
Let’s name the Jeroo Kim. Kim should do the following:
Turn around // now at (4, 1) facing South|br| Disable two nets in a row
Toss
Hop once // now at (4, 2) facing South
Toss
Hop once // now at (4, 3) facing SouthGet the flower
Hop once // now on flower at (4, 4) facing South
PickGo back to (4, 1) and turn around
Turn around // now at (4, 4) facing North
Hop 3 times // now at (4, 1) facing North
Turn around // now at (4, 1) facing South
2.1.3.3.4. Review the Algorithm (Step 5)
The high-level algorithm helps manage the details.
We used a “turn around” step in example 4.2. We can use the same logic here.
The act of turning around appears as a step in the high-level algorithm and as part of the “Go back to (4, 1) and turn around” step. Interesting!
2.1.3.3.5. Possible Behaviors
“Turn around” is used three times
- The sequence “Toss, Hop” is used two times in the “Disable
nets” step.
We will create a custom Jeroo subclass and write a
Jeroo method for each of these behaviors, but first, we need to define
a purpose, preconditions, and postconditions for each method. This can
be done informally, because we will write these things in a comment
block at the beginning of each method.
Note
Method: turnAround()
Purpose: Make the Jeroo turn 180 degrees
Preconditions:
none
Postconditions:
The Jeroo has turned 180 degrees
The Jeroo is at the same location
Note
Method: tossAndHop()
Purpose: Disable a net and move to the newly cleared location
Preconditions:
There is a net ahead
The Jeroo has at least one flower
Postconditions:
The net has been disabled
The Jeroo has one less flower
The Jeroo is at the location originally occupied by the net
The Jeroo has not changed direction
The last postcondition of the tossAndHop() method simply
says that the Jeroo is facing the direction it was facing at the start
of the method. It does not prohibit the Jeroo from changing direction
during the course of the method as long as the Jeroo returns to its
original direction at the end.
2.1.3.3.6. Java Code for “Clear Nets and Pick”
As before, we should develop the code as a series of builds. To
start this process, create a new project using BlueJ
use the “New Class…” button to create a new subclass of Island called
ClearNetsAndPick for this example. Also, create a
new subclass of Jeroo called ClearingJeroo
to hold your Jeroo methods.
Once you have these classes created, make sure they are compiled.
Edit the constructor provided in your ClearNetsAndPick class
to create and add flowers and nets at the appropriate starting
locations on the island.
Then right-click on your ClearNetsAndPick class and
create an instance of it, which will then fill the world view.
2.1.3.3.7. FIRST BUILD
The recommended first build contains three things:
The
myProgram()method in your island subclass that creates and sends messages to the Jeroo.Declaration and instantiation of every Jeroo that will be used. This implies adding an appropriate constructor to our
Jeroosubclass.The high-level algorithm in the form of comments.
Skeletons for each of the Jeroo methods in your Jeroo subclass. These skeletons are often called stubs.
Note
A method stub, or just a stub, is a bare skeleton of a method that will compile, but is really just a placeholder for the real method definition that will come later.
The myProgram() method goes inside your
ClearNetsAndPick class:
public void myProgram()
{
    Jeroo kim = new Jeroo(NORTH, 5);
    this.addObject(kim, 4, 1);

    // --- Turn around ---

    // --- Disable nets ---

    // --- Get the flower ---

    // --- Go back to (4, 1) and turn around ---

}
An appropriate constructor and the new Jeroo methods go inside your
ClearingJeroo class:
// ----------------------------------------------------------
/**
 * Create a new Jeroo.
 * @param direction The direction the Jeroo is facing.
 * @param flowers   The number of flowers the Jeroo is holding.
 */
public Jeroo(CompassDirection direction, int flowers)
{
    super(direction, flowers);    // Let the superclass initialize these
}


// ----------------------------------------------------------
/**
 * Turn the jeroo around 180 degrees so it faces the opposite
 * direction.
 *
 * @precondition  None.
 *
 * @postcondition The Jeroo has turned 180 degrees.
 * @postcondition The Jeroo is at the same location.
 */
public void turnAround()
{
}


// ----------------------------------------------------------
/**
 * Disable a net and move to the newly cleared location.
 *
 * @precondition  There is a net ahead.
 * @precondition  The Jeroo has at least one flower.
 *
 * @postcondition The net has been disabled.
 * @postcondition The Jeroo has one less flower.
 * @postcondition The Jeroo is at the location originally occupied by the net.
 * @postcondition The Jeroo has not changed direction.
 */
public void tossAndHop()
{
}
2.1.3.3.8. SECOND BUILD
This build finishes the turnAround() method and uses it
in the myProgram() method. It would be wise to test this
method four times, each time start with Kim facing in a different
direction. Once we are comfortable that this method works correctly, we
can proceed with the next build.
In the ClearNetsAndPick class:
public void myProgram()
{
    Jeroo kim = new Jeroo(NORTH, 5);
    this.addObject(kim, 4, 1);

    // --- Turn around ---
    kim.turnAround();                 // new code

    // --- Disable nets ---

    // --- Get the flower ---

    // --- Go back to (4, 1) and turn around ---

}
In the ClearingJeroo class:
// ----------------------------------------------------------
/**
 * Turn the jeroo around 180 degrees so it faces the opposite
 * direction.
 *
 * @precondition  None.
 *
 * @postcondition The Jeroo has turned 180 degrees.
 * @postcondition The Jeroo is at the same location.
 */
public void turnAround()
{
    this.turn(LEFT);                  // new code
    this.turn(LEFT);                  // new code
}


// ----------------------------------------------------------
/**
 * Disable a net and move to the newly cleared location.
 *
 * @precondition  There is a net ahead.
 * @precondition  The Jeroo has at least one flower.
 *
 * @postcondition The net has been disabled.
 * @postcondition The Jeroo has one less flower.
 * @postcondition The Jeroo is at the location originally occupied by the net.
 * @postcondition The Jeroo has not changed direction.
 */
public void tossAndHop()
{
}
2.1.3.3.9. THIRD BUILD
This build finishes the tossAndHop() method and uses it
in the myProgram() method. Our focus is on destroying the
two nets.
In the ClearNetsAndPick class:
public void myProgram()
{
    Jeroo kim = new Jeroo(NORTH, 5);
    this.addObject(kim, 4, 1);

    // --- Turn around ---
    kim.turnAround();

    // --- Disable nets ---
    kim.tossAndHop();                 // new code
    kim.tossAndHop();                 // new code

    // --- Get the flower ---

    // --- Go back to (4, 1) and turn around ---

}
In the ClearingJeroo class:
// ----------------------------------------------------------
/**
 * Turn the jeroo around 180 degrees so it faces the opposite
 * direction.
 *
 * @precondition  None.
 *
 * @postcondition The Jeroo has turned 180 degrees.
 * @postcondition The Jeroo is at the same location.
 */
public void turnAround()
{
    this.turn(LEFT);
    this.turn(LEFT);
}


// ----------------------------------------------------------
/**
 * Disable a net and move to the newly cleared location.
 *
 * @precondition  There is a net ahead.
 * @precondition  The Jeroo has at least one flower.
 *
 * @postcondition The net has been disabled.
 * @postcondition The Jeroo has one less flower.
 * @postcondition The Jeroo is at the location originally occupied by the net.
 * @postcondition The Jeroo has not changed direction.
 */
public void tossAndHop()
{
    this.toss();          // new code
    this.hop();           // new code
}
2.1.3.3.10. FOURTH BUILD (final)
This build finishes the myProgram() method. We need
to check to see that Kim has the correct number of flowers at the
end.
In the ClearNetsAndPick class:
public void myProgram()
{
    Jeroo kim = new Jeroo(NORTH, 5);
    this.addObject(kim, 4, 1);

    // --- Turn around ---
    kim.turnAround();

    // --- Disable nets ---
    kim.tossAndHop();
    kim.tossAndHop();

    // --- Get the flower ---
    kim.hop();            // new code
    kim.pick();           // new code

    // --- Go back to (4, 1) and turn around ---
    kim.turnAround();     // new code
    kim.hop(3);           // new code
    kim.turnAround();     // new code
}
2.1.4. Selection
The methods that we have written thus far have a common characteristic–sequential execution. Sequential execution means that the statements are executed one after another in the order that they appear in the source code. In this chapter, we will learn how to create a block of statements that we can either execute or skip, as well as how we can choose to execute one of multiple alternative blocks of statements.
A control structure is a feature of a programming language that determines the order in which statements will be executed. There are three categories of control structures: (1) sequential structures, (2) selection structures, and (3) repetition structures (also called loops).
Sequential structure is the default structure that is used by most object-oriented programming languages: putting one statement after the other, in sequence. Unless we indicate otherwise, the statements will be executed in the order that they appear in the source code, and each statement will be executed exactly once. Every program that we have seen thus far uses nothing but sequential structure.
A condition is a crucial part of the selection structures and the repetition structures. A condition is any expression that can be either true or false.
Note
A condition is any expression that can be true or false.
Every selection structure defines two or more alternate paths through the source code. There are three important selection structures: an if-then-else structure, an if-then structure, and a multi-way branching structure.
An if-then-else structure (sometimes called an if-else structure) is the most fundamental selection structure, since it can be used to form any choice pattern possible. An if-then-else structure defines two different blocks of statements, only one of which will be executed.
An if-then structure (sometimes called simply an if structure) is a special form of if-then-else where only one block of statements is provided and the second block of statements is omitted. As a result, an if-then structure defines an optional block of statements, where the block is either executed or skipped.
A multi-way-if structure (sometimes called a multi-way branching structure) defines several different blocks of statements, only one of which will be executed. Java also has a switch structure to create a multi-way branching structure, but we’ll learn about it later.
2.1.5. Conditions Using Sensor Methods
The Jeroo class provides a number of sensor methods that can be used to
ask a Jeroo something about its immediate surroundings. Each sensor method has
either a true or a false result. Any method that produces either true or false
as a result is called a boolean method (also called a predicate).
More generally, any expression that is either true or false is called
a boolean expression (named after
George Boole ). This means
that the conditions that are used in various control structures are, in
fact, boolean expressions.
Note
Any method that produces either true or false as a result is called a boolean method, also known as a predicate.
For Jeroos, the sensor methods are the basic building blocks for creating conditions. The simplest way to create a condition is to invoke a sensor method. The table below lists all of the sensor methods provided by the Jeroo class. These methods can only be used to construct conditions. Since they are methods, they are invoked by sending a message to a Jeroo object.
Method |
Purpose |
Example |
|---|---|---|
|
Does this Jeroo have any flowers? |
|
|
Is there a clear space in the indicated direction? A clear space contains no flower, no net, no water, and no Jeroo. [ |
|
|
Is this Jeroo facing in the indicated direction? |
|
|
Is there a flower in the indicated direction? |
|
|
Is there another Jeroo in the indicated direction? [ |
|
|
Is there a net in the indicated direction? [ |
|
|
Is there water in the indicated direction? [ |
|
Notably, when you see relativeDirection, your choices of direction
include HERE, LEFT, RIGHT, and AHEAD. When you
see compassDirection, your choices of direction are: NORTH,
SOUTH, EAST, and WEST.
2.1.6. An Overview of Conditional Statements
2.1.7. Java’s Syntax for the If-Then-Else Structure
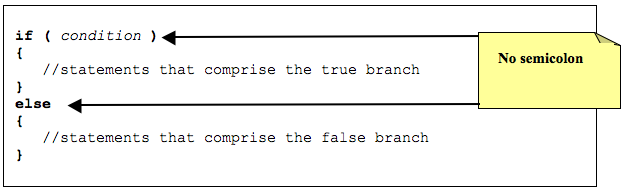
This figure shows the syntax of the if-then-else structure in Java. There are four important things to observe about the syntax.
The condition must be in parentheses.
There is no semicolon after the parentheses.
There is no semicolon after the keyword
else.The if-then-else structure is not a method, which means that we do not send it as a message to a Jeroo object.
There are three important things to observe about the coding style.
Braces are used to define the beginning and end of both the true branch and the false branch. Always include them.
The braces are aligned with the start of the words
ifandelse.The statements between the braces should be indented (we use 4 spaces).
2.1.7.1. Example (if-then-else structure)
Have the Jeroo named Timmy check for a net straight ahead. If there is one, have him disable it and turn around. If there is not a net straight ahead, Timmy should turn right. After he disables the net and turns around or simply turns right, Timmy must move one space forward.
if (timmy.seesNet(AHEAD))
{
    timmy.toss();
    timmy.turn(LEFT);
    timmy.turn(LEFT);
}
else
{
    timmy.turn(RIGHT);
}

timmy.hop();
2.1.8. Creating Optional Statements With If-then
An if-then structure (sometimes called an if structure) defines an optional block of statements. An if-then structure is simply an if-then-else structure where the second block of statements (the else part) has been omitted, so that the choice becomes whether to execute the first block of statements or skip it.
There are two parts to an if structure, the selection condition and the true branch. The true branch contains a block of statements that will only be executed whenever the selection condition is true.
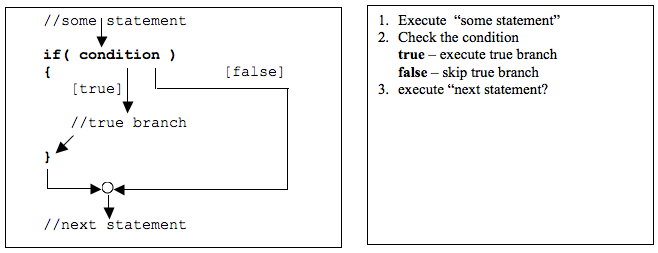
The figure above shows a generic if-then structure, and uses arrows to show the order in which statements will be executed. The if structure defines optional code, and that code is either skipped or executed just once.
2.1.9. Java’s Syntax for the If-then Structure
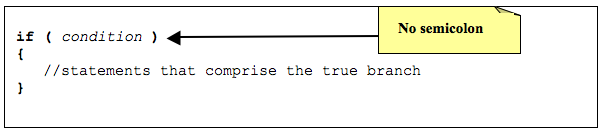
This figure shows the syntax of the if-then structure in Java. There are three important things to observe about the syntax.
The condition must be in parentheses.
There is no semicolon after the parentheses.
The if-then structure is not a method, which means that we do not send it as a message to a Jeroo object.
There are three important things to observe about the coding style.
Braces are used to define the beginning and end of the true branch. Always include them.
The braces are aligned with the start of the word
if.The statements between the braces should be indented (we use 4 spaces).
2.1.9.1. Example (if-then structure)
Have the Jeroo named Jessica check for a net to her right. If there is one, have her disable it and return to her current state. Whether or not she disables a net, Jessica should hop one space ahead.
if (jessica.seesNet(RIGHT))
{
    jessica.turn(RIGHT);
    jessica.toss();
    jessica.turn(LEFT);
}

jessica.hop();
2.1.10. Java’s Syntax for the Multi-way Selection Structure (a cascaded if)
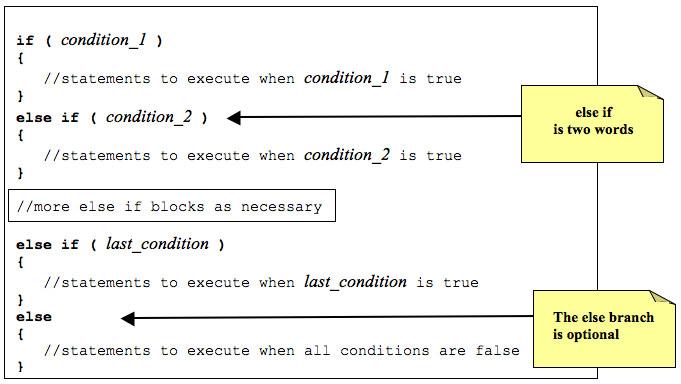
This figure shows a common technique for writing a multi-way selection structure in Java. Technically, this structure consists of a series of nested if-then-else statements, but the coding style obscures this fact and makes the multi-way selection logic more visible. This particular structure is often called a cascaded if.
There are five important things to observe about this structure.
The condition must be in parentheses.
There is no semicolon after the parentheses.
There is no limit on the number of else-if blocks.
The final
elsebranch is optional.This structure is not a method, which means that we do not send it as a message to a Jeroo object.
There are three important things to observe about the coding style.
Braces are used to define the beginning and end of the true branch. Always include them.
The braces are aligned with the start of the word
ifandelse.The statements between the braces should be indented (we use 4 spaces).
2.1.10.1. Example (multi-way selection structure)
Assume that a Jeroo named Louisa is carrying at least one flower. Have her check the cell ahead. If that cell contains a flower, pick it. If that cell contains a net, disable it. If that cell contains water, plant a flower at the current location. If that cell contains another Jeroo, give that Jeroo a flower. Finally, if there is nothing in that cell, have her hop once and turn left.
if (louisa.seesFlower(AHEAD))
{
    louisa.hop();
    louisa.pick();
}
else if (louisa.seesNet(AHEAD))
{
    louisa.toss();
}
else if (louisa.seesWater(AHEAD))
{
    louisa.plant();
}
else if (louisa.seesJeroo(AHEAD))
{
    louisa.give(AHEAD);
}
else
{
    louisa.hop();
    louisa.turn(LEFT);
}
2.1.11. Your Opinions on Course Grading Policies
Please Complete the following survey. The survey includes questions regarding your opinions on the grading policies in this course and how you approach learning in this course. We will use this information to understand better how you are affected by these policies so that we can improve the course.
Towards the end of the survey you will be asked if you consent for your answers and course data to be used in a study about grading policies. There is no additional work on your part if you provide consent for your data to be used in the study. Completing the survey should take less than 30 minutes. Your course instructor will not know whether you agree to participate until after you have completed the course and final grades have been turned in. You will earn assignment credit for submitting this survey, whether or not you agree to participate in the study or decline to answer some or all of the questions.
CS 1114 Grading Policies Survey 1Please answer below and your submission of the survey will be verified for credit.
2.1.12. Repeating Actions
In the previous sections, we learned how to use an if-then-else or if-then structure to decide which action to perform. In this section, we will learn how to create a block of statements that can be executed several times in succession. We do this using a repetition structure (also called a loop), which is one of the fundamental control structures supported by most imperative and object-oriented programming languages.
A repetition structure (or loop) allows a group of statements to be executed several times in succession. There are three important repetition structures: a loop repeats an action for every object in a collection of objects, a loop that is controlled by the state of the objects in the program, and a loop that is controlled by a counter (usually a number). In this chapter, we are going to focus on just one kind of loop, one that is controlled by the state of the objects in the program. This happens to be the most general and most fundamental kind of repetition structure in many programming languages.
2.1.13. Generic Repetition Structures
There are two major parts to every repetition structure, the body and the controlling condition. These two parts provide a way to classify loops.
The block of statements that can be executed repeatedly is called the body of the loop. Each time that the statements in the body are executed is called a trip (or iteration) through the loop, and the number of times the body is executed is called the trip count.
The controlling condition is a condition that is checked to determine whether to make a trip through the body or terminate the loop. The controlling condition is rechecked after each trip through the body of the loop.
One criterion for classifying loops is based on when the controlling condition is checked relative to the first trip through the body. In a pretest loop, the controlling condition is always checked before the body can be executed for the first time. In a posttest loop, the controlling condition is not checked until after the first trip through the body. In either case, the condition is checked after each trip through the body to determine whether or not to make another trip.
A second criterion for classifying loops is based on whether a true condition or a false condition leads to a trip through the body. In a while loop, a true condition leads to a trip through the body, but a false condition terminates the loop. In an until loop, a true condition terminates the loop, but a false condition leads to a trip through the body. The difference between the while and until loops is summarized in this table:
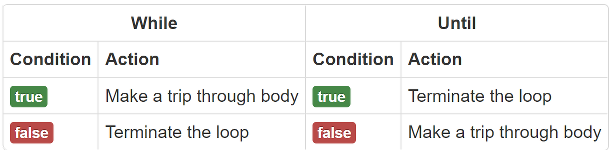
Combining these two criteria, we can define four broad categories of loops: pretest while, pretest until, posttest while, and posttest until. Few programming languages provide all four of these (most only provide two, or even one!), but the most common form that is supported in virtually every imperative and object-oriented programming language is the pretest while loop. We’ll focus exclusively on pretest while loops in the remainder of this chapter.
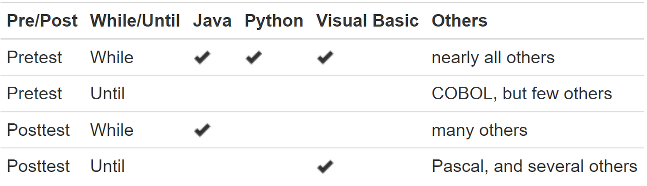
Since the pretest while loop is the most common repetition structure across imperative and object-oriented languages, we will take a closer look at it.
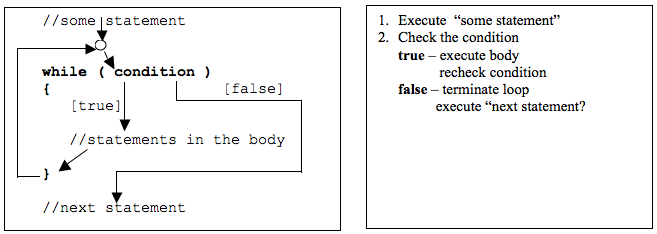
The figure above shows a generic pretest while loop and uses arrows to show the order in which statements are executed and the condition is checked.
2.1.14. Java’s Syntax for the While Loop
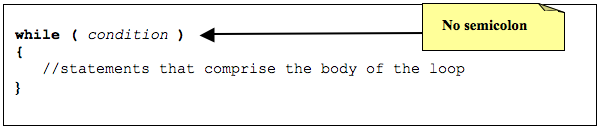
The figure above shows the Java syntax for a pretest while loop in Java. There are three important things to observe about the syntax.
The condition must be in parentheses.
There is no semicolon after the parentheses containing the condition or after the keyword
else.The while structure is not a method, which means that we do not send it as a message to a Jeroo object.
There are three important things to observe about the coding style.
Braces are used to define the beginning and end of both the body of the while statement. Always include them.
The braces are aligned with the start of the word
while.The statements between the braces should be indented (we use 4 spaces).
2.1.14.1. Example (pretest while structure)
Assume that a Jeroo named Kim is not standing on a flower, but there is a line of flowers ahead. Have Kim pick all of those flowers, and stop as soon as there is no flower directly ahead. After picking all of the flowers, Kim should turn to the left.
while (kim.seesFlower(AHEAD))
{
    kim.hop();
    kim.pick();
}

kim.turn(LEFT);
2.1.15. A First Taste of Testing: Verifying Jeroo Behavior
When you write a program or create a new method for a Jeroo, how do you know that it actually works?
So far, you have probably run your programs visually in BlueJ, watching the Jeroo hop across the island grid and checking whether it ended up in the right place. While visual inspection is helpful when getting started, it has serious limitations:
It is slow and requires manual effort every time you change your code.
It is easy to miss subtle bugs (such as turning one too many times or stopping one cell too early).
As programs grow larger, you cannot manually check every possible scenario.
In professional software development, programmers write automated unit tests–small, dedicated pieces of code whose sole job is to execute a specific method or action and verify that the result matches expectations.
2.1.15.1. The Anatomy of a Test Class
In Java, unit tests are organized into a separate class that extends student.TestCase. By convention, if you are testing a class named NetRemover, your test class is named NetRemoverTest.
Here is a complete, working example of a test class:
import student.TestCase;
import static org.assertj.core.api.Assertions.*;

// -------------------------------------------------------------------------
/**
 * Unit tests for the NetRemover class.
 */
public class NetRemoverTest extends TestCase
{
    // 1. Declare fields to hold the objects you will test
    private Island island;
    private NetRemover jeroo;

    // ----------------------------------------------------------
    /**
     * The setUp() method runs automatically BEFORE every single test method.
     * It creates a fresh island and actor so each test starts from a clean slate.
     */
    public void setUp()
    {
        island = new Island();
        jeroo = new NetRemover();
        island.addObject(jeroo, 3, 1);
    }

    // ----------------------------------------------------------
    /**
     * Test that turnAround() correctly faces the Jeroo in the opposite direction
     * without changing its (x, y) coordinates.
     */
    public void testTurnAround()
    {
        // 1. Execute the action to test
        jeroo.turnAround();

        // 2. Assert (verify) that the postconditions match expectations
        assertThat(jeroo.getX()).isEqualTo(3);
        assertThat(jeroo.getY()).isEqualTo(1);
        assertThat(jeroo.getHeading()).isEqualTo(WEST);
    }

    // ----------------------------------------------------------
    /**
     * Test that a jeroo correctly picks a flower and clears a net.
     */
    public void testPickAndClear()
    {
        // Place a flower on the island for testing
        island.addObject(new Flower(), 4, 1);

        // Execute the action
        jeroo.hop();
        jeroo.pick();

        // Assert that the jeroo now holds a flower in its pouch
        assertThat(jeroo.hasFlower()).isTrue();
        assertThat(jeroo.getX()).isEqualTo(4);
    }
}
2.1.15.2. Understanding the Key Parts
The Test Fixture (setUp): The setUp() method is special. Before JUnit runs any test method, it executes setUp() first. This guarantees that each test method runs with a brand-new, independent island and actor, preventing one test from interfering with another.
Test Methods (public void test…()): Every test method must be public void and its name must start with test (such as testTurnAround or testPickAndClear). When you run the test class in BlueJ, JUnit automatically finds and runs every method starting with test.
Assertions with assertThat(…): An assertion is a statement that checks whether a condition is true. If the assertion succeeds, the test passes (showing a green bar). If the assertion fails (for example, if jeroo.getX() was 2 instead of 3), the test stops immediately and reports an error (showing a red bar).
2.1.15.3. Common Assertions for Jeroos
When testing Jeroo methods, you will most frequently use three categories of assertions:
Assertion Syntax |
What It Checks |
|---|---|
assertThat(jeroo.getX()).isEqualTo(expectedX); |
Verifies the Jeroo’s horizontal x-coordinate. |
assertThat(jeroo.getY()).isEqualTo(expectedY); |
Verifies the Jeroo’s vertical y-coordinate. |
assertThat(jeroo.getHeading()).isEqualTo(EAST); |
Verifies the Jeroo’s compass direction (EAST, SOUTH, WEST, or NORTH). |
assertThat(jeroo.hasFlower()).isTrue(); |
Verifies that the Jeroo is holding at least one flower. |
assertThat(jeroo.isWater(AHEAD)).isFalse(); |
Verifies that there is no water directly ahead. |
In Chapter 3, you will explore testing much more deeply–learning how to design comprehensive test suites, test all branches of if-else statements and loops, and practice Test-Driven Development (TDD). But for now, you already have the power to write automated checks for your Jeroo methods!
2.1.16. Programming Practice 2